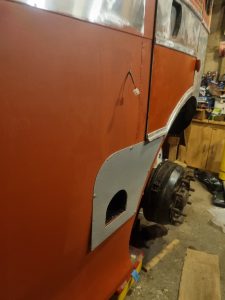
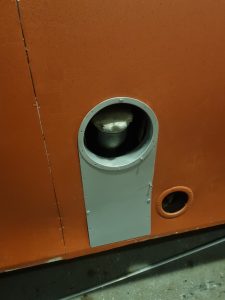
Work started in the first week of 2024 with trimming and painting the first of the four O/S half-drop window frames and trial fitting and painting (twice!) of the splash panel and bezel for the tank filler. Next to receive attention was the moulding that fits around the O/S wheelarch. This needed paint stripping then a lot of fettling to get it presentable, it might have been quicker to make a new piece but possibly more difficult. Priming the N/S lower panels last week revealed a few dents and ripples that were attended to with new filler bought for the purpose. This was mostly complete by the end of Saturday 6th but some remained to be sanded before priming again, hopefully on Monday next week.
Tag Archives: exterior panels
30/12/2023
This week I only had a few days work as Christmas intervened, but I was able to prepare for prime all the lower panels on both sides of the bus. This included abrading the clean metal and then priming the O/S, this had to be done to allow fettling and fitting of the splash panel and protector around the the tank filler. Some filling and sanding was necessary on the N/S, the first panels fitted in November 2020. The nearside panels have now been primed, revealing more filling is required to the lower part of the first two panels from the entrance rearward. As P38 is very sluggish in cold weather some alternative filler has been ordered which will hopefully arrive soon. As a prelude to building the remaining window pans, I started fettleing the frame uprights in preparation for the chrome vinyl covering.
As this is the last entry of the year, a summary of work completed in the last twelve months is appropriate.
This year’s work did not start until February, due to my spell of ill health.
New metalwork for the cab was fabricated and fitted and the cab painted throughout, allowing the floor and some fittings to be reinstalled.
“Low Racks” signs were designed and made for the seat backs.
A correct cooling fan was obtained by Ian and fitted by me.
The destination box was painted throughout and is ready for electrics and blinds to be installed.
New fuel pipes were made up and connected to the tank and the existing piping that runs behind the engine.
A new speedometer cable outer was manufactured and the cable connected to the speedo.
All the chassis wiring has been renewed and a multicore cable laid in conduit along the chassis to the boot. A new cover was fabricated in aluminium for the wiring where it enters the control bux under the cab floor.
The O/S rear wheelarch was fabricated, fitted and prepared for paint.
The O/S rear corner panel was filled, sanded and painted and all the O/S panels fitted and primed.
24/12/2023
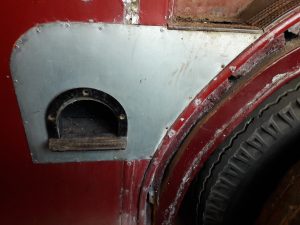
Monday’s planned task was to prime some of the O/S panelwork, principally to allow fitment of the kick panel by the cab door. This has been cut and fettled to fit the ironwork surround for the step. The ironwork itself needed straightening and removal of much rust, including grinding down the original welds which must have prevented it from ever fitting flush against the kick panel. The picture at the bottom of the page shows how it was with the ironwork poorly fitted and with an incorrect cut-out for the step. Although I chose a good piece of metal for the kick panel, I found it had a lot of small marks so I had to rub it down and spray it with smooth Hammerite silver. I could not face making another so it will have to do. Had a problem with the panel in front of the tank bowing outwards, released the screws along the bottom and halfway up the forward edge, warmed it a bit then pushed it back into place. I put another screw in just below the tank filler where it wil be hidden by the splash plate. Seems ok. I started to fit the bezel to the hole for viewing the fuel gauge, heated it up and bent it a bit too far. Unfortunately I managed to crack it in two places whilst getting it right but it seems to be holding together and fits well enough now, so I fitted it using a bit of seam sealer, hoping it will stick together and be ok. It does look ok. I sprayed the the ironwork for the step with No. 1 rustbeater and then engine lacquer black. It needs a couple more coats but is looking nicer already. The final job before Christmas was to make the splash panel for the tank filler, cutting it to fit around the duct end that I am using to trim the hole and stiffen the whole side panel. On Christmas day I updated 2023’s plan and created a new one from it for 2024. I hope to have the bus substantially complete by this time next year.


