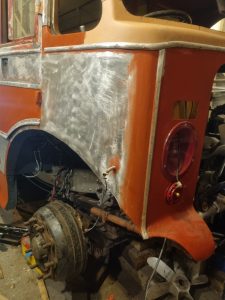
In order to fit new gaiters to the wheel-mounted brake servos, I found I had to remove them completely. Started on the driver’s side and found the servo was actually loose! Just as well as the two rear nuts are very difficult to reach. Took the end cap off, which involved some brutality to two of the screws, and freed up the piston. I then cleaned, wire-brushed and alumablasted it ready for reassembly when replacement screws arrive. I found time to tap 2BA the holes in one of the metal floor sections for the clamp plate bezels for the rubber seal for the handbrake lever. Made a repair section for the rotted steel below the cab window , welded it to the existing metal, primed it then fitted the new front offside corner panel. I reused the vertical beading to ensure all the holes lined up! The last of the front end wiring is in, this being to the sidelight mounted on the new front quarter panel. I fitted the horizontal half-round beading around the cab front. I also stripped and started to paint the steel rain/draught excluder for the cab door. I also realised I need to do the same for the emergency door, which meant I had to make some minor alteration to the beading on the new panels. The various screws for the cab floor steel sections arrived on Saturday so next week should see some progress on that. The screws for the brake servo end cab also arrived, so that can be reassembled now too.
Tag Archives: exterior panels
6/08/2023
Only two working days this week owing to other commitments. All the threaded studs in the cab floor mounts have been die-nut (1/4″ BSF) cleaned ready for reinstallation of the cab floor. 1/4″ UNF screws have been ordered for the clamp plate (rubber gasket around gear lever and steering column) for the forward metal section of the cab floor. The steel plate for the panel below the driver’s signalling window has arrived and a new panel fabricated using a carboard template made from the rotten original. This has been primed and painted and awaits fitting. Also arrived are three faux leather universal gear lever gaiters, two for the brakes and one for the gear lever. The O/S vacuum actuator has had the end cap removed for inspection and the adjuster nut removed from the operatind rod which is slightly bent.
30/07/2023
A reasonably useful week. The headlight bowl has been fitted to the cab, as has the horn, using rubber gaskets made from the sealing material for the cab floor. The steel front section of cab floor had a final coat of paint and the pedal/steering column aperture has the holes tapped 1/4 UNF for the sealing rubber clamp plate. The steel for that has arrived too. The conduit carrying wiring to the horn and headlight/panel light has been secure to the cab outer wall and a length made up for the sidelight. I devised a way of adapting the conduit to fit the sidelight by soldering a piece of tinned steel tubing into the threaded part of the light assembly. I cut the new front o/s corner panel and am in the process of attempting a temporary fit so the sidelight conduit can be installed, then all the front external wiring will be done.

